Archivos de diario de abril 2020

01 de abril de 2020

March 2020 Photo-observation of the Month

Congratulations to coleen61 for winning the March 2020 Vermont Atlas of Life iNaturalist photo-observation of the month. The image of the rare Crested Caracara that made an appearance this month in Woodstock, Vermont won the adoration of naturalists this month. Incredibly, this is the second time this species has been seen in Vermont! You can read all about this sighting and the first one in a great blog post by VCE's Nathaniel Sharp.


Withover 3,300 photo-observations submitted by 408 observers this month, it was very competitive. Click on the image to see and explore all of the amazing photo-observations.

Known for their wandering, Crested Caracaras have very infrequently turned up in such far-flung places as New YorkMaine, and even Nova Scotia. These surprise appearances, however, are not believed to result from migratory “overshooting,” as Crested Caracaras are a sedentary resident species throughout their range. Instead, it is thought that primarily young birds, and occasionally older individuals, disperse in search of new territories, occasionally flying remarkably long distances, perhaps being blown even further off course by strong weather patterns. These oddball birds that stray so far from home may be the pioneers ultimately leading to species’ range expansions over time—flying far and wide ensures finding new habitats, ecological niches and territories, some of which may provide suitable breeding opportunities. While climate change very likely plays a factor in the incremental range expansions northward of birds like Tufted Titmice and Northern Mockingbirds, or upslope in birds like the Blackpoll Warbler, far-ranging individual birds like the Vermont Crested Caracara, or Maine’s famous Great Black Hawk were likely driven by other as-yet unknown reasons.

Visit the Vermont Atlas of Life on iNaturalist where you can vote for the winner this month by clicking the ‘fav’ star on your favorite photo-observation. Make sure you get outdoors and record the biodiversity around you, then submit your discoveries and you could be a winner!

Publicado el abril 1, 2020 03:57 TARDE por kpmcfarland kpmcfarland | 0 comentarios | Deja un comentario

07 de abril de 2020

Tech Tip Tuesday: Digiscoping

All this sunshine is making me optimistic. While I know that it’s not going to last, it’s at least inspiring me to get out, play in my garden, and explore the nearby woods, before the next rush of cold and rain. And it’s also adding some much-needed physical light to a dark, uncertain time. It’s much easier to step away from the news when the view out the window looks warm and inviting.

The wildlife too seems to be capitalizing on this sunny spell. Over the weekend I saw a moose while out hiking, as well as sign of other animals, including coyotes and a bear. Sadly, I could only photograph the moose during my hike, however I did get to photograph a Barred Owl while out gardening the other day. In short, the wildlife is abundant, and signs of spring are everywhere—you don’t have to go far! Even just a quick trip into your backyard can introduce you to new wildlife and plant neighbors.

This Week on Tech Tip Tuesday

What happens when the animal or plant you wish to photograph is far away, say at the top of a tree or across a field? If you are a professional or advanced amateur photographer, you probably have a camera lens that can bridge the gap. However, if you usually take pictures with your smartphone or don’t have a wide array of camera lenses, you may struggle in these situations to get a clear photo.

If you fall into the latter category, there’s good news—by using either a spotting scope or pair of binoculars, you can take close-up photos without an expensive camera or lens. Known as “digiscoping” (when done through a spotting scope), this practice was originally coined in the 1990’s and has gained popularity in recent years. This method allows birders and other naturalists to get a close-up shot of the critter in question while still giving it plenty of space. However, this practice is not just for birds and other flighty wildlife. You can also use this technique to snap close-ups of fungi or plants that you may not be able to get to close to, such as flowers at the top of a tree.

It’s possible to get incredibly clear photos using this method, however there are several factors to keep in mind.

Spacing—The more distance there is between your camera lens and the eyepiece of your viewing equipment, the more likely you are to get “vignetting” (a dark, circular frame around your photo). The lenses also need to be close enough to avoid light getting between them—this will cause a shadow in the affected part of your picture. You also want to make sure that your phone or camera is held firmly in place, otherwise it may slip and leave you with a partial photo.

There are plenty of fancy adapters for connecting your phone or camera to your spotting scope or binoculars, however these can be expensive. It’s possible to brace the devices with your hand, keeping your finger between your phone lens and eyepiece, however this works best for smartphones. You can also make your own adapter at home using PVC pipe or a similarly sized piece of material. A quick Google search shows many different websites that might guide you through this process.

Stability—You want your setup to be as stable as possible since magnification amplifies small movements and can lead to blurry photos. When using a spotting scope, use a tripod to help stabilize your image. Binoculars are a bit trickier but with some practice you will find ways to brace your arms that will help your photos come out more clearly.

Lighting—Sometimes photos will come out underexposed when digiscoping. One of the most common causes is zooming in with your camera or phone because it reduces the amount of light taken in. Zooming in also further amplifies any shakiness that may occur. While it may seem somewhat counterintuitive, try to avoid using your camera’s or phone’s zoom when digiscoping.

Try not to be discouraged if your first digiscoped photos aren’t perfect. Digiscoping takes practice, even for seasoned photographers. However, once you get comfortable with it, it’s a powerful tool for getting close-up shots of faraway specimens or photographing animal behavior that you may not see if you were closer. And remember, any photo of a species, even those that aren’t National Geographic-quality, adds more valuable data than no photo.

TTT Task of the Week

If you have a pair of binoculars or a spotting scope, practice photographing plants, animals, and fungi from afar. You can photograph birds in your yard, or even a flower you see growing across the street. Just make sure to stay safe!

If you want some more, in-depth information on how to get started, check out either this article from All About Birds or this article from Audubon.

As always, thanks for helping us map Vermont’s biodiversity, stay safe, and happy observing!

Publicado el abril 7, 2020 03:03 TARDE por emilyanderson2 emilyanderson2 | 0 comentarios | Deja un comentario

08 de abril de 2020

Vermont Atlas of Life on iNaturalist Webinar Today at 9am!

Looking for an excuse to step outside and explore the nature found in your backyard? Then give iNaturalist a try! iNaturalist is a crowd-sourced identification tool powered by A.I. that helps you identify the plants, animals, and fungi that share your neighborhood. Tune in on Wednesday, April 8th at 9am for the first episode in the new Vermont Atlas of Life webinar series where you will learn all about using iNaturalist.

Date: Wednesday, April 8th

Time: 9:00 am
Location: Webinar
Meeting ID
https://meet.google.com/chg-zqxp-nfx?hs=122&authuser=1
Phone Numbers
(‪US‬)‪+1 262-727-4074‬
PIN: ‪779 397 092#‬

Publicado el abril 8, 2020 12:47 TARDE por kpmcfarland kpmcfarland | 0 comentarios | Deja un comentario

Join Our Spring Wildflower Phenology Annotation Blitz!


Vermont Bloodroot flowering phenology for iNaturalist annotated data. There are several hundred observations that are not annotated! Help us add important data. (click on image to visit page).

Long-term flowering records initiated by Henry David Thoreau in 1852 have been used in Massachusetts to monitor phenological changes. Phenology—the study of the timing of natural events such as migration, flowering, leaf-out, or breeding—is key to examine and unravel the effects of climate change on ecosystems. Record-breaking spring temperatures in 2010 and 2012 resulted in the earliest flowering times in recorded history for dozens of spring-flowering plants of the eastern United States.

You can be like Thoreau right from home! There are thousands of images of plants that observers like you have added to the Vermont Atlas of Life on iNaturalist. But, they have not been annotated so that we can easily track phenology.

Help us add this valuable information. It's easy and fun! All you have to do is look at beautiful images of plants and note whether they have flower buds, flowers, or fruits.

Learn more on the VCE Blog post about this mission!

Publicado el abril 8, 2020 03:17 TARDE por kpmcfarland kpmcfarland | 0 comentarios | Deja un comentario

14 de abril de 2020

Tech Tip Tuesday: Adding Annotations with Identify

April showers may bring May flowers, however I wish the cold would leave a little faster. It’s wonderful to walk in the woods, or even just step outside, and find the sights and sounds of spring bursting into bloom. Despite the chilly weather, all the ponds near my house are reverberating with frog calls, and birds of all shapes and sizes can be seen flitting among tree branches. Early flowers and the first hints of green are also beginning to speckle the woods. This weekend, I came across several dappled patches of trout lilies while out hiking and plan to keep an eye out for their first flowers. If you are interested in wildflowers and recording when they bloom, now is the time to go out and explore!

This Week on Tech Tip Tuesday

This week we’re revisiting a topic I discussed way back in January: using identify. However, today I’m getting a lot more specific. Identify is a great tool for more than just suggesting an observation—it’s also an easy way to add annotations to someone else’s observation. If you need a refresher on annotations, check out TTT #1.

Annotations are important to include year round, however they are especially important in the spring. By tracking when spring wildflowers bloom every year, scientists can gain valuable information about how natural systems are responding to climate change. To read more about why annotating spring wildflowers is important, visit the VCE blog.

Adding annotations through identify is fairly easy, especially if you’ve already been using identify to suggest identifications. To start, navigate to the identify page by clicking on the tab across the top of your screen that says “Identify”. Once on the page, I recommend starting by entering “Vermont, US” into the place search box and clicking “Go”. This will limit your search to Vermont. Now, if you have a favorite spring wildflower (Red Trillium for example), you can enter its species name into the species search bar, or you can simply type in “Flowering Plants” (subphylum Angiospermae) to see all the flowering plant observations in Vermont.

Once you have those set, it’s time to add some filters to help narrow your search (“Filters” is located to the right of “Go”). The first filter you need to change is the quality grade (located in the top left corner). When you first open identify, it’s automatically set to “Needs ID”, however there are plenty of research grade wildflower observations that need annotations. Under “Quality Grade”, click in the check box next to “research grade”. Now, you will see research grade observations as well as ones needing identification.

Since we’re looking for spring wildflowers, the next place to go is “Date Observed” (top right corner). When you start, it will be set to any, however we want to change it so that it only focuses on spring wildflowers. Select “Months” and click on the dropdown menu. I recommend selecting March through July.

The final key step is to narrow your search to flowers that need annotation. Under “Description and Tags” in the bottom left corner you will see a link that says “More Filters”—click on it. Under this section, go to the middle and click on the dropdown menu under “Without Annotation”. Change it from “None” to “Plant Phenology”, and leave the second dropdown menu set to “Any”.

Once all your filters are set, click “Update Search” at the bottom of the filter box.

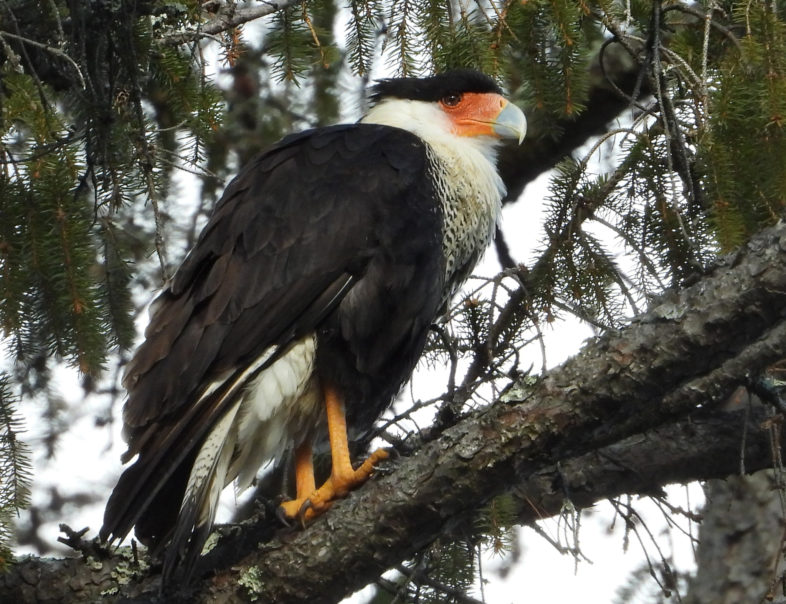
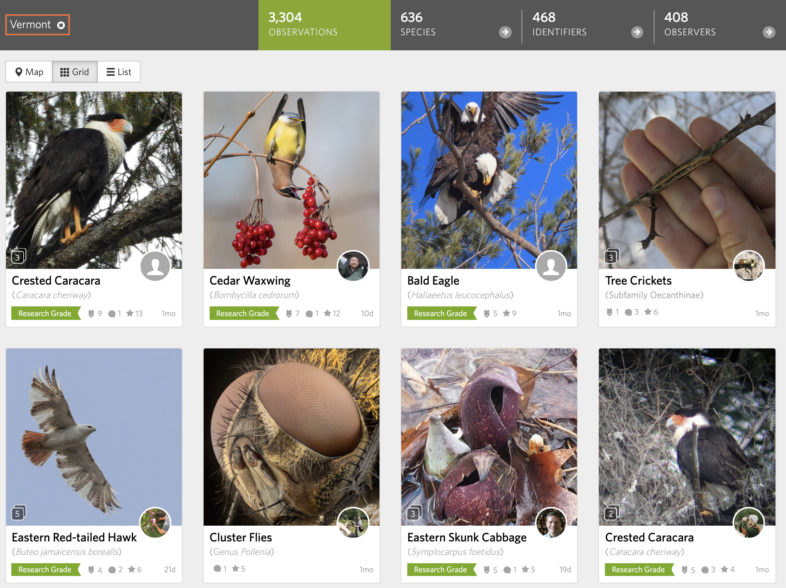
Now you should see a grid (or a list or map, depending on your viewing settings) of photos with plants. Not all may be flowering, however if you see anything that looks wildly out of place (a frog perhaps), double check your settings.

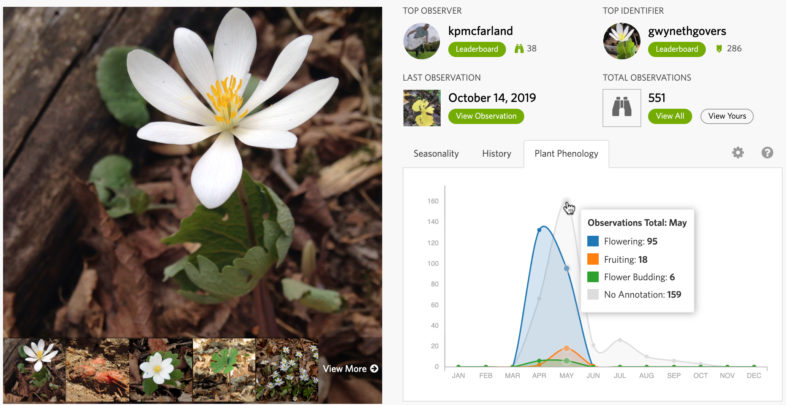
To start, click on the first observation. To get to annotations, click on the “Annotation” tab in the menu to the right of the observation’s picture. Two options should appear: “Sex” and “Plant Phenology”. Look at the photo(s) included with the observation—is the plant flowering, fruiting, or budding? Click on the dropdown menu next to “Plant Phenology” and choose the appropriate answer. If the plant didn’t have flowers, fruits, or buds, select “No evidence of flowering”.

You can also make these same selections using handy shortcuts. To view shortcuts, click on the keyboard icon in the bottom left corner of the observation box. Notice that for plant phenology, you can type “p” “l” to mark it as flowering, “p” “r” to mark it as fruiting, “p” “u” to mark it as budding, and “p” “n” to mark it as no evidence.

Regardless of which method you choose, you should see your annotation appear next to “Plant Phenology” with your profile picture. When you see this, you’ve successfully added an annotation and can continue you on to the next one. To get to the next observation, you can either click on the arrow to the right of the observation box or hit the right facing arrow on your keyboard.

Once you get the hang of it, the process is very simple and you can easily fly through observations!

TTT Task of the Week

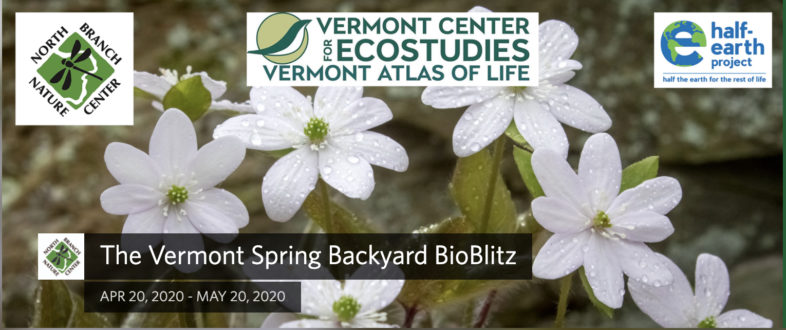
This week I want you all to take part in our Spring Wildflower Phenology Annotation Blitz. Use the steps provided above to add annotations to wildflower observations and help us better understand how Vermont’s wildflowers are responding to climate change. If you have wildflowers in your yard, I also encourage you to take photos of them over the coming weeks and share those photos with the Vermont Atlas of Life.

Thank you for helping us map Vermont’s biodiversity, stay safe, and happy observing!

Publicado el abril 14, 2020 05:05 TARDE por emilyanderson2 emilyanderson2 | 2 comentarios | Deja un comentario

21 de abril de 2020

Tech Tip Tuesday: Finding Target Species

I don’t know about you, but I’m ready for warmer weather. As someone who grew up in Vermont and has lived up north for every winter of her life, you would think that I would be used to all this by now. Don’t get me wrong, I love spring—new leaves unfurling, flowers blooming, and critters returning from their winter refuges. Over the past few weeks, I’ve enjoyed checking the vernal pools in the surrounding forest for signs of life. Egg masses of all shapes and sizes have popped up and I look forward to the day when I find tadpoles wriggling among the submerged leaves. Spring is without doubt a magical time of year and I hope that you are all able to catch glimpses of it wherever you are!

This Week on Tech Tip Tuesday

Ever wonder which species you have not seen in a particular area?

As naturalists, our aim is to learn as much as we can about the species around us. However, the more species we accumulate in our life lists, the harder it gets to pick out the missing ones. If you have thousands of observations, how do you figure out which species are missing? Luckily, a URL exists that will allow you to view all the species you are missing for a certain area! To read more about this URL in the iNaturalist forum, check it out here.

Using this method is pretty straightforward. To start, copy this URL into your browser: https://www.inaturalist.org/observations?hrank=species&place_id=47&subview=grid&unobserved_by_user_id=emilyanderson2. This will take you to an iNaturalist page showing all the species I have not seen in Vermont (it is quite a lot—I need to get out more).

Before I tell you how to change the URL to view your own missing species, let’s take a look at what it contains. The first part, “www.inaturalist.org/” sends you to the website. The next section, “observations?”, takes you to the Explore page. “hrank=species” appears to display only species-level identified observations. “place_id=” is the section that pertains to where I want observations from—“47” is the ID number for Vermont. “subview=grid” means that all my Explore results will be displayed in grid format. And finally, the section that sets this URL apart: “unobserved_by_user_id=” will narrow the search to only observations of species that are unobserved by the user whose name is added. If you want to learn more about using URLs on iNaturalist, check out this TTT.

If you want to see a list of the Vermont species you are missing, all you must change is the user ID in the URL. If you do not remember what your user ID is, you can get it from your observations—it should be displayed to the right of the observation’s photo. Once you have your user ID, simply delete my ID (emilyanderson2) from the URL and add yours instead. Then hit enter.

You will see a list of observations. If you want to see a list of the species, click on “Species” in the grey bar at the top of the page.

Now, what happens if you want to see all the species you are missing for an area besides Vermont? Simple—you change the place ID number. Searching for a new place is the easiest way to do this. Click the “x” next to “Vermont” on the left-hand side of the grey box. Then, go to the Location search box and type in your new location. When you hit enter, you should see a list of species from the new place.

And that’s it!

TTT Task of the Week

This week, I want you to explore using the URL provided above. Make it specific to you and the areas you are interested in. I also challenge you to get out in your yard and see how many unobserved species you can find. Want some additional motivation for searching your backyard? Take part in the Vermont Spring Backyard Bioblitz sponsored by North Branch Nature Center, the Vermont Alliance for Half-Earth, and the Vermont Center for Ecostudies’ Vermont Atlas of Life.

Thank you for helping us map Vermont’s biodiversity, stay safe, and happy observing!

Publicado el abril 21, 2020 08:07 TARDE por emilyanderson2 emilyanderson2 | 1 comentario | Deja un comentario

23 de abril de 2020

Join the Vermont Spring Backyard BioBlitz on iNaturalist

Discover the natural world right at home! Though we may be physically distanced this season, we're still a united community of curious nature lovers and naturalists. This project is for students, teachers, parents, kids, experts, amateurs, and anyone across Vermont looking to explore nature apart but together. From April 20th through May 20th, we invite you to join the Vermont Spring Backyard BioBlitz! sponsored by North Branch Nature Center, the Vermont Alliance for Half-Earth, and the Vermont Atlas of Life at the Vermont Center for Ecostudies.

What is a Bioblitz?

A bioblitz is a community science effort to record as many species within a designated location and time period as possible, in this case, our own backyards and properties. Bioblitzes are great ways to connect and learn about the biodiversity around us while generating useful data for science and conservation.

Your Observations Added to the Vermont Atlas of Life

Your observations also help us discover, map and monitor life across Vermont for the Vermont Atlas of Life on iNaturalist too. Join our growing community of citizen naturalists from around the Green Mountain State in discovering and sharing observations of Vermont life. Your observations can be turned into research-grade, citizen science data that will help us discover, track and ultimately conserve our natural heritage. Over the last 7 years, over 7,600 observers like you have contributed nearly 400,000 observations of about 8,000 species. We've discovered new species for the state, documented flower phenology, found new populations of rare plants and animals, and learned about our natural heritage from each other too.

Getting Started in Just Three Easy Steps

  1. If you don't already have an account, visit iNaturalist.org and signup.
  2. Go to the Vermont Spring Backyard BioBlitzProject on iNaturalist and click "Join" in the upper right corner.
  3. Start submitting observations to iNaturalist using your smart phone or tablet and the free iNaturalist app or a camera and your computer! All the observations you make during the project time period (April 20 - May 20) will be automatically added to this project and the Vermont Atlas of Life.
  4. Check back on the project regularly to see how many observations you have added and who else has contributed!

Need More Help?

Here's your chance to find out how many plants and animals share your backyard with you! And the Vermont Spring Backyard Bioblitz and the Vermont Atlas of Life on iNaturalist are the perfect tool to help you keep track and learn more. Good luck and see you on iNaturalist!

Publicado el abril 23, 2020 01:40 TARDE por kpmcfarland kpmcfarland | 1 comentario | Deja un comentario

24 de abril de 2020

An Observation Contest for Young Naturalists!

VCE's Vermont Atlas of Life is excited to announce our first Observation Contest for students. While stuck at home, nature is still open for exploration and discovery, and so are our imaginations. For young scientists from kindergarten to 6th grade, now is the time to create the new Vermont species of your imaginings and submit your observation for review by VCE scientists.

Submissions will be reviewed every two weeks until the end of the school year and top submissions will be shared on our social media accounts. Read more at the link below for instructions and details:

http://val.vtecostudies.org/events/observation-contest-2/

Publicado el abril 24, 2020 06:05 TARDE por emilyanderson2 emilyanderson2 | 0 comentarios | Deja un comentario

Help us record Vermont's Whip-poor-wills!

If you stand outside around dusk on a warm evening beginning in May, you might just hear a distinctive call: whip-poor-will, whip-poor-will! A male Eastern Whip-poor-will is somewhere nearby and the Vermont Center for Ecostudies wants to know!

The Eastern Whip-poor-will is listed as a threatened species in Vermont—making monitoring populations incredibly important. Due to their nocturnal habits during non-breeding season, little is known about their migration, however we estimate that they arrive in southern Vermont around May 1st and in northern Vermont by May 10th.

How can you help? All you need to do is go outside about 20 minutes after sunset, listen for the males’ distinctive calls, and record them with your phone. Males will usually start calling about 30 minutes after sunset and continue until it gets too dark to see their prey. You can upload your Whip-poor-will recordings to iNaturalist and share them with the Vermont Atlas of Life.

In their breeding season, Whip-poor-wills favor open areas with sandy soils and pine stands or large powerline cuts, however we lack robust data on where they stop in Vermont. They could be just about anywhere—including downtown Burlington! So, even if you do not have much time during the day, you can go for a walk at sunset. Just make sure to bring your headlamp and phone to record frogs, snipe, owls, and, hopefully, Whip-poor-wills!

Publicado el abril 24, 2020 06:13 TARDE por emilyanderson2 emilyanderson2 | 0 comentarios | Deja un comentario

28 de abril de 2020

Tech Tip Tuesday: Removing Photos from Observations

The trees in my backyard are beginning to leaf out! Although there is also a patchy inch of snow on the ground right now, the faint haze of greenery returning to the woods is a welcome sign of spring. Another sign of spring is the large Black Bear my neighbors saw lumbering along the edge of their property the other evening. I’m now on the lookout for signs that it has visited my yard and look forward to documenting them on iNaturalist.

I’ve really enjoyed watching everyone’s great observations from the Vermont Spring Backyard BioBlitz pour in over the last week. Although we can’t explore Vermont’s landscape together, it’s still exciting to see what everyone is finding. If you live in Vermont and haven’t participated yet, I highly recommend checking it out!

This Week on Tech Tip Tuesday

We all make mistakes--that’s why erasers exist. Sometimes, when using iNaturalist, we may add a photo to an observation that we later realize we don’t want to include. Maybe the subject is out of focus or partially cut from the frame. Or maybe it’s a second, different organism included in the observation. While it may be tempting to upload all the squirrels you see in your backyard in a single morning as one observation, you need to add photos of different individuals as separate observations. The general rule is: if the date, time of day, location, or individual are different, do not combine multiple photos into a single observation. However, it is ok (and encouraged) to create an observation with multiple photos of the same individual taken at the same time and place.

What happens if you’ve already created an observation with multiple photos and you want to remove one of them? Where is iNaturalist’s eraser? While the method for deleting a photo from an observation isn’t exactly obvious, it is fairly simple.

To start, go to your “Your Observation” page on the computer version of iNaturalist and select the observation you want to remove a photo from. Once on the observation’s page, click “Edit” located in the top right corner. Once the edit page is open, you will see three columns of information: “What did you see?” at the top of the left column, “Where were you?” in the middle column, and “Add media” in the right column. You want the right column.

“Add media” is understandably the place you will go when you want to add a photo to an existing observation. All you need to do to add a photo is go to the section that says “Select One or More Photos”, click “Choose File”, and upload as you normally would.

To remove a photo, you go to your “Selected Photos” section in the same box--here you should see all the photos currently displayed in the existing observation. Notice that each photo has a checkmark above them. To delete a photo from an observation, all you need to do is click that checkmark to unselect it, then click “Save observation” at the very bottom of the page. If you look at your observation, the photo you deleted should be gone.

Bonus tip: If you noticed on the “Edit” page below the “Add media” box, there was a link that said “Re-order photos”. If you want your existing photos to appear in a different order (let’s say a particularly crisp photo is last in line), click on this link. Then, you can re-order your photos by typing a number next to them that corresponds to a new place in the line-up (typing a 3 next to a photo will make it the third photo on the observation’s page).

TTT Task of the Week

Go back through some of your observations and check whether there are any photos you want to remove. Pay close attention to see if there are any photos that should belong in a separate observation. If you find any you want to delete (or re-order!), use the steps above to make the necessary changes.

That’s all for this week! Thank you for helping us map Vermont’s biodiversity, stay safe, and happy observing!

Publicado el abril 28, 2020 08:22 TARDE por emilyanderson2 emilyanderson2 | 0 comentarios | Deja un comentario

Archivos