Archivos de diario de mayo 2020

01 de mayo de 2020

April 2020 Photo-observation of the Month: American Woodcock

Congratulations to Roy Pilcher for winning the April 2020 Vermont Atlas of Life iNaturalist photo-observation of the month. The arrival of the American Woodcock is one of the exciting signs of spring in Vermont. And Roy's image celebrated this beautifully with one strutting their stuff.

Withover 12,500 photo-observations submitted by 948 observers this month, it was extremely competitive. Click on the image to see and explore all of the amazing photo-observations.

Aldo Leopold called their spring display the sky dance in his 1949 classic A Sand County Almanac. Usually a few minutes after sunset, male woodcocks begin to display. Each defends a small area on the ground were the peent, a short (~0.2 seconds) buzzy note is repeated over and over. If you are close enough you can also hear each peent preceded by a short (0.3 seconds) tuukoo, wukoo or ka-rurr sound. The two sounds often merge into one, tuukooeeent. He may also give tuukoo calls at widely separated intervals (0.2–30 seconds) initially after alighting on display area or when alert to strange sounds.

The sky dance begins when the “peenting” bouts end. There are five parts to the flight:

  1. a silent, gradual ascent lasting about 2 seconds;
  2. a continued gradual ascent with light wing twittering for about 12 seconds;
  3. the wing twittering becomes melodious as he climbs steeper and then loops into spirals for about 15 seconds;
  4. the apex of the flight lasts for about 12 seconds and may be 300 feet high, as the wing twittering becomes intermittent with rapid, short bursts, overlapping with loud, vocal chirping during the initial descent as he zig-zags, dives, and banks, then pitching down again precipitously;
  5. a silent descent lasts up to 8 seconds as he brakes to the ground with soft but audible flapping wings and lands back on his stage to resume another bout of peenting.

The twittering sound is produced by air passing between three attenuated outer primary feathers on the wing. The outer primaries of a male American Woodcock are narrowed (termed emarginated), which produces whistling twitters during the sky dance. The chirping calls made during the sky dance are a fast, repetitive series of 4–6, melodious notes – chirp-chirp-Chirpchirpchirp, repeated.


American Woodcock wing from a bird that had been hit by a car. The three flight feathers at the end, which are reduced in size, make the whistling sound as the fly overhead displaying. / © K.P. McFarland

Sometimes they will give a rapid, harsh cackle, ca-ca-ca-ca-ca , as they fly low over another peenting male. Cackling is probably an aggressive challenge. Sometimes the peenting bird may chase the aggressor and cackle back. If two peenting males are too close to each other, they may give aggressive cackle calls on the ground too.

As many as 24 sky dances can be performed by an individual during an evening performance, but most average a half dozen per night. As twilight disappears from the western sky, the performers retire for the night and wait for the dim light of the morning for another bout of sky dancing.

Visit the Vermont Atlas of Life on iNaturalist where you can vote for the winner this month by clicking the ‘fav’ star on your favorite photo-observation. Make sure you get outdoors and record the biodiversity around you, then submit your discoveries and you could be a winner!

Publicado el mayo 1, 2020 05:34 TARDE por kpmcfarland kpmcfarland | 1 comentario | Deja un comentario

05 de mayo de 2020

Tech Tip Tuesday: Observation Basics

Raise your hand if you got sunburnt this weekend. I know I did. We had a glorious weekend in my small corner of the northeast with warm temperatures and mostly sunny skies. I’m trying not to think about the snow that’s forecasted for later this week and choosing to look at the newly fanning foliage instead of the dark grey clouds. While at times frustrating, this unpredictable weather will make those first true warm days of summer all the sweeter.

As always, spring remains undeterred and marches forward, regardless of what the weather throws at it. This morning I saw a proud tom turkey puffing out his feathers in the woods near my house, likely showing off for a female just out of sight. I hope that you all are also finding joy in the signs of spring near you. If you’re curious about all May has to offer, check out VCE’s Field Guide to May.

This Week on Tech Tip Tuesday

This week, we’re going back to the basics. While reviewing observation basics may feel unnecessary to some experienced users, getting reminders can be helpful for everyone at any stage in their iNaturalist adventures. I often find that in reviewing the building blocks, I remember steps that I should be taking yet often forget in the rhythm of regular practice. I hope these tips do the same for you.

For those of you who are new iNaturalist users or just new to the Vermont Atlas of Life, welcome! I hope the tips provided below help answer questions you may not have realized you had. If you are looking for additional tips and tricks for becoming a better iNaturalist user, I recommend checking out previous Tech Tip Tuesdays on the Vermont Atlas of Life website. If you have a burning question that isn’t answered there, you can either ask me directly or submit it as a future Tech Tip Tuesday topic.

Now, let’s get started.

Tip #1—Adding multiple photos. The first consideration when creating an observation is which photos to upload. Each iNaturalist observation can only identify one species. That means that you should not upload multiple photos where each contains a different species (one photo has a maple, another a frog, another a groundhog). You can upload photos with more than one species in them (say a bumble bee on a flower), however you will only be able to identify either the bumble bee or the flower. You can duplicate that observation if you want to identify the other species in it. Finally, you also need to make sure that all photos included in your observation are of the same individual. If you decide you want to record all the maple trees in your backyard, you need to make an observation for each individual maple tree, instead of adding all of them to one observation. The exception is if individuals are so close together that it’s impossible to photograph them separately, like a herd of deer or flock of birds.

General rule: only upload multiple photos in one observation where the date, time, location, and individual are the same.

Tip #2—Make your subject obvious. When selecting photos, you want to make sure that the observation’s subject is obvious so that other users know what they’re helping you identify. If it’s not obvious, you can crop the photo or add a circle or arrows to indicate what you’re interested in. For example, in my observation of a moose, I circled the moose to make it obvious. This is particularly helpful in photos of forest edges where it may not be immediately clear which tree species you’re interested in.

General rule: if the subject isn’t clear, find a way to make it obvious.

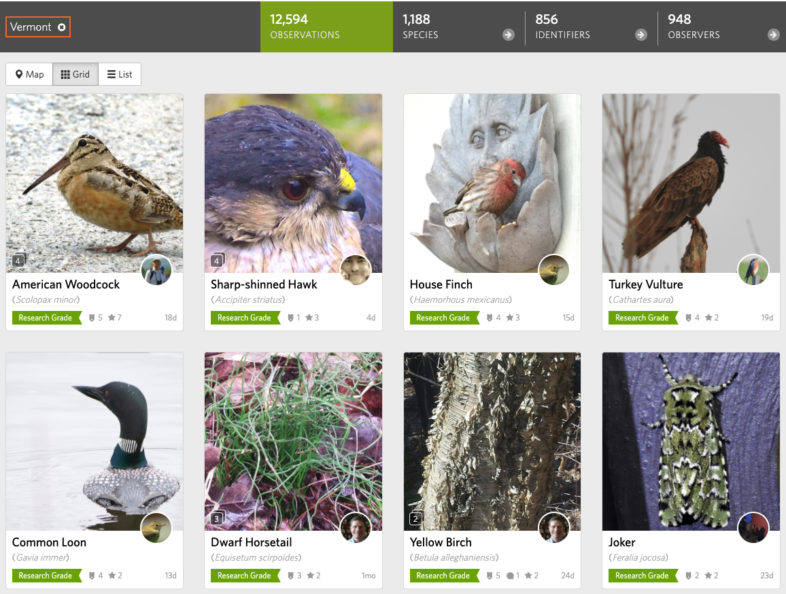
Tip #3—Add an identification. Identifications are one of iNaturalist’s cornerstones. However, what should you do if you have no idea what you saw? The first thing to do is look at the suggestions generated by iNaturalist’s artificial intelligence. If you see a species that you are confident is the correct identification, select that. One helpful clue is looking to see if the species is marked as “visually similar/seen nearby”. If you can’t confidently select a species, you can look at the suggested genus or family. If this seems like a good fit, select it and another user will likely be able to help narrow the identification down from there. If the genus or family suggestion also seems wrong, or none is provided, you can leave it as a broader identification, such as “bird”, “amphibian”, or even “plant”. Using these broader identifications will help other users who are looking to help identify birds or plants find your observations more easily. Ultimately, you want to avoid leaving the identification box blank or just as “unknown”. This will make it harder for others to find your observation.

General rule: when in doubt, go with what you know for sure, even if all you know is that you saw a plant or animal.

Tip #4—Check the location. An observation’s location is one of the most important pieces of data provided and is necessary for an observation to reach research grade status. It’s how scientists and those of us reviewing the data can figure out if a species is new to an area. If you’re using your smartphone, the location will usually appear automatically and correctly, but not always. Always double check your location when uploading an observation. In some cases, you may have to add it manually by clicking the box that says “Location”. If needed, you can also check your locations in batches after uploading by using iNaturalist’s calendar tool.

General rule: always check to make sure that locations are accurate either while uploading or afterwards.

Tip #5—Mark as captive or cultivated when necessary. In general, you should focus your citizen science efforts on wild species, however occasionally a domesticated species sneaks in. When you upload an observation of a pet, potted or garden plant, zoo animal, or any living thing that is placed in a spot by humans, you need to mark it captive or cultivated (there is a box that you check on the upload page). Marking it as such will help others correctly use your observation when gathering data from iNaturalist.

General rule: always mark captive or cultivated animals and plants.

Tip #6—What you should and shouldn’t add. You should definitely add observations of any living (or recently dead) wild plant, animal, or fungi you come across, or signs such as fur, tracks, scat, or seeds. People often falter when it comes to adding observations of super common species such as Gray Squirrels and American Robins, however these are important to include. Who knows, these species we consider common now could disappear someday and scientists will want to know where they once lived. Rare species are important to add too. Don’t worry, iNaturalist automatically obscures their coordinates so other people can’t find and harvest or capture them. On the other hand, you shouldn’t add photos of fossils, inanimate objects, or people. iNaturalist is not designed to record them and uploading photos of humans brings into question privacy law issues.

General rule: do upload sightings of living and recently dead wild animals, plants, and fungi; do not upload photos of fossils, inanimate objects, or people.

I know that countless other tips exist beyond the handful I’ve listed, so please feel free to add ones that have helped you in the comments below!

TTT Task of the Week

When you set out to upload your observations this week, I want you to keep the tips above in mind. Try and check yourself to see if you’re accidentally adding photos that should go in separate observations or forgetting to mark a captive or cultivated observation. If you have tips that you want other users to know, please share them in the comments below!

As always, thank you for helping us map Vermont’s biodiversity, stay safe, and happy observing!

Publicado el mayo 5, 2020 06:41 TARDE por emilyanderson2 emilyanderson2 | 1 comentario | Deja un comentario

07 de mayo de 2020

May Mission: Wild Bee Survey

VCE’s Vermont Wild Bee Survey  is assessing and documenting all bee species in the state, from the tiny Eight-spotted Miner Bee to the scary-looking and invasive Sculptured Resin Bee. There is so much happening in the Natural World in May that it’s easy to get overwhelmed. To help, we’ve put together this list of bees to be on the lookout for. Since many bees are not possible to identify to species without a microscope, we have chosen a few species that are relatively distinctive to allow us the best chance to identify them from your May iNaturalist photo-observations.

Southeastern Blueberry Bee (Habropoda laboriosa) - Not yet known from Vermont, but worth looking for, especially in southern parts of the state. Superficially similar to a bumble bee worker, but smaller than the queens that are active right now. Strong affinity for blueberries.

Clark’s Mining Bee (Andrena clarkella) - A northern willow specialist with distinctive orange hairs on the hind legs.

Dunning's Mining Bee (Andrena dunningi) - A relatively large, forest-dwelling Andrena. The thorax is covered in short reddish hair and the abdomen is shiny and black. Seems to be uncommon.

Milwaukee Mining Bee (Andrena milwaukeensis) - A common late spring species that seems to be tied to flowering understory trees such as Mountain Maple and Hawthorn. Distinctive with long red hairs on T1 and T2 (the upper part of the abdomen).

Eastern Carpenter Bee (Xylocopa virginica) - Seen by some as a pest since it has a habit of drilling holes in untreated wood and defending its space aggressively. Not a serious threat to humans or structures, but an interesting species to monitor since it has expanded its range northward. Still mostly confined to the warmer parts of the state, but it has been recorded from as far north as Alburgh and Montpelier.

Bufflehead Mason Bee (Osmia bucephala) -  A well-named bee that we don't know a lot about. I've seen it on lupins in gardens and deep in the woods.

Many of the most interesting May bees are hard to identify Andrena that specialize in a small group of flowers. Plants with specialists of interest that should be blooming in May include dogwoods, blueberries, geraniums, cinquefoils, bittercress, Virginia Waterleaf, Sheep Laurel, and Golden Alexander. Of course we encourage you to post any and all sightings (bees or otherwise) to the Vermont Atlas of Life on iNaturalist.

Publicado el mayo 7, 2020 01:09 TARDE por kpmcfarland kpmcfarland | 0 comentarios | Deja un comentario

12 de mayo de 2020

Tech Tip Tuesday: Improving Insect Observations

I know that it’s hard to believe, but warm weather is right around the corner. I promise. If you need something to entice you out the door, then just listen to the birdsong pouring in from all sides. This morning I saw a Rose-breasted Grosbeak perched on a tree in my backyard, my first sighting of this bird on my property! Despite having spent more time in my yard over the past month and a half than I have in a long time, I still encounter new plants and animals almost every week. As we continue forward into this unusual spring, I hope that you are also finding regular joy in discovering (or re-discovering) your wildlife neighbors. I know that I personally enjoy seeing everyone’s great observations on iNaturalist every week!

This Week on Tech Tip Tuesday

As the weather has gotten warmer, I’ve noticed a dramatic increase in the number of insect observations added to iNaturalist. Of course, this is to be expected and with their astonishing diversity, who wouldn’t be curious about them? Insects undoubtedly are fascinating subjects to add to your observation collection.

However, they’re not always the easiest animals to document. Some move far too quickly. Some are too difficult to find. And some are too small and end up out of focus. Below I’ll offer some tips on how to address these issues and improve your insect observations.

Most importantly, you first need to find insects. The easiest way to find insects is simply by looking and listening. Take some time to really observe the landscape around you. Explore at different levels by looking close to the ground among blades of grass, on and under flowers and leaves, and on the bark of trees and shrubs. Some insects prefer to hide out of sight, so you may find them in crevices between rocks or under fallen trees. Just make sure that you return any rocks or logs you move to their original spot.

You may have greater success finding fast moving insects by standing in place and fixing your eyes on a single spot. I find that if I let my vision soften, I can often see bees, butterflies, and moths flying more easily than if I was intensely focusing my eyes. Closing your eyes and focusing on sounds may help as well. Maybe you will hear a buzz or a chirp that will let you know which direction to move in.

If searching by sight isn’t yielding many new insect discoveries, you can also try a net or a sheet. If you have a finely meshed net, you can sweep it through tall grass or shrubs to capture insects who may be hiding. You can also target a specific insect with a net, however this is most easily done with flying insects who are just taking off or landing on a plant. Once you have captured an insect in your net, pinch off the top with your hand to keep it from escaping before you’re ready for a closer look.

You can also search for insects in taller trees or shrubs by shaking them. Simply place a light-colored sheet under the tree or shrub before shaking. As you shake, insects will fall and land on the sheet where you can get a closer look at them.

Now that you hopefully have found some insects, it’s time to photograph them for your observation! There are two main approaches: you can either photograph your insect in a clear container or “in the wild”. For photographing in a container, a small jar often works best. Just make sure to release the insect after you’re done photographing it. However, a container isn’t always necessary. You should be able to photograph slower moving insects on their own without too much trouble. To photograph faster insects, try to approach them slowly and avoid having your shadow fall across them. If you’re careful, you should be able to get close enough for a photo.

Regardless of which approach you choose, try to photograph the insect from as many angles as possible. Some identifying features are only visible from a particular side, so the more you can photograph, the easier it will be for others to help identify your insect. However, it’s important to keep in mind that some species are nearly impossible to satisfactorily identify, no matter how many photos you take. And that’s totally fine! Even though insects can be difficult to identify, it’s still important to add observations because there’s always a chance that you’ve made an exciting find.

One of the biggest challenges when photographing insects is getting your subject in focus. The best way to get a clear photo is to use a macro lens or macro setting (often depicted as a flower in your camera’s settings). If this isn’t possible, try shooting from slightly farther away and zooming in, rather than bringing the camera as close to the insect as possible. Don’t be afraid to play around and figure out which settings work best for your camera. It may take a bit of practice.

The most important thing to remember when photographing insects is that any photo is better than no photo. Even blurry or distant photos can be useful for identifying some species!

TTT Task of the Week

This week, I want you to find and photograph insects using some of the tips above. You don’t need to use all of them--just pick one or two that stuck out to you. If you’re looking for some inspiration, take part in our Backyard Lady Beetle Blitz starting this Friday! The goal is to find as many lady beetles as possible over four days. Or, if pollinators are more your thing, get out and look for some bees or butterflies. The good news is that, when it comes to insects, there’s never a shortage of species waiting to be recorded!

That’s all for this week! Thank you for helping us map Vermont’s biodiversity, stay safe, and happy observing!

Publicado el mayo 12, 2020 05:53 TARDE por emilyanderson2 emilyanderson2 | 2 comentarios | Deja un comentario

15 de mayo de 2020

Let the Beetle Blitz begin!

Today is the first day of the Backyard Lady Beetle Blitz! Join VCE's Kent McFarland and Emily Anderson at 12pm for the official kick-off. They will explain why we need a better understanding of Vermont’s lady beetle populations and how citizen scientists can help. For information on joining the webinar, visit the event announcement: https://bit.ly/3cp2KB6.

Can’t make it to the kick-off but still want to participate? No worries! All you need to do is find as many lady beetles as you can in your backyard and upload photos of them to the Vermont Lady Beetle Atlas on iNaturalist. Participating is as easy as search, photograph, and upload! You can learn more about the Backyard Lady Beetle Blitz on the VAL website: https://bit.ly/2Ld4bXm.

The official Backyard Lady Beetle Blitz runs from May 15th (today) until May 18th, however you can keep searching far beyond the end date. Visit the Vermont Lady Beetle Atlas to learn how you can participate in our summer surveys: https://bit.ly/2WAk6Wk.

Publicado el mayo 15, 2020 02:38 TARDE por emilyanderson2 emilyanderson2 | 2 comentarios | Deja un comentario

19 de mayo de 2020

Tech Tip Tuesday: Anyone Can Use Identify!

At last, the weather forecast shows that local temperatures will range in the 70s and even into the 80s this week! While I acknowledge that it will probably only take a couple weeks of low- to mid-80s and high humidity to make me miss the cooler weather, for now I welcome this break from the unseasonable cold. And in case you were wondering, yes this spring has been unusually cold. While most regions of the world recorded above-average temperatures for April, the northeastern United States was actually cooler than average.

As the weather warms and invites us all to spend more time outdoors, keep on the lookout for exciting new observations. If you can, pick a spot in your yard or favorite spot in nature and visit it regularly for signs of wildlife. For me, I have decided to check a forested path below my house for tracks and scat and regularly watch my garden for insect activity. I have already recorded three different bumble bee species visiting the flowers—who knows what might be next!

This Week on Tech Tip Tuesday

Today, I want to expand on a topic I covered a couple months back: identifying. If you’re new to Tech Tip Tuesdays, I recommend checking out my first post on using Identify. It will walk you through the basics and help you get started.

iNaturalist use has undoubtedly increased over the past few months. At the Vermont Atlas of Life, we have seen our observations jump by nearly 20,000 over the last month. With this increase in observations, we need even more people jumping in to help with identifications in order to keep up!

When I suggest adding identifications, one of the responses I often receive is “I’m not an expert in a particular species. How can I help?”. When it comes to identifying, there’s a place for everyone, even if you don’t consider yourself an expert. Below, I have listed some suggestions of different ways to get involved in iNaturalist as an identifier.

First, pick a target. While it may feel easier to randomly search through the observations, it will likely be more helpful to have a focus when you’re getting started. Start by choosing a particular species or broader taxonomic group and move on from there.

Start with the basics. You might be surprised to know that there are a lot of observations out there without even a basic identification, such as plant, animal, or fungi. If you’re feeling uncertain about identifications, start here. You can find all the observations labeled as “Unknown” and help them progress towards a species-level identification just by adding “plant”, “animal”, or “fungi” where relevant.

Stick with the familiar. I bet there are at least a couple common species that you recognize well enough to identify. Even identifications for American Robins, Grey Squirrels, and Striped Skunks need verification. Just pick your favorite common, easily recognizable species and start adding identifications!

Look for the gardens. If you’re uncomfortable helping with identifications, you can also use the identify tool to add “captive/cultivated” designations to observations that need them. Look for common garden plants, such as daffodils or tomatoes. Or, you can also add the same label to pictures of people’s pets.

Add additional information. As I’ve mentioned before, annotations are important to fill out because they provide additional information about the individual you observed that can help scientists track long-term species-level trends. Annotations, especially those for plant phenology, are relatively easy to fill out, making them a simple way to drastically improve an observation’s quality.

Double check. You can also search for observations that are already marked as research grade. While these are often correct, there are instances where a misidentified observation will sneak through. This creates misleading data and needs to be corrected. Go through research grade observations for a specific species and look for outliers. If you check for an easy to identify species, it should be fairly obvious when it’s identified incorrectly.

These tips are by no means the only ways to use Identify, however I hope they inspire you to get involved!

TTT Task of the Week

This week, I want you to practice using Identify by applying a couple of the tips listed above. The main point that I hope you take away is that anyone can use identify, regardless of skill level. If you’re interested in resources that will help you learn how to identify a particular species or group, check out our identification resources.

That’s all for this week! Thanks for helping us map Vermont’s biodiversity, stay safe, and happy observing!

Publicado el mayo 19, 2020 04:41 TARDE por emilyanderson2 emilyanderson2 | 0 comentarios | Deja un comentario

Join the Vermont Backyard Bird Quest—23 May 2020

On May 23rd, spring migration will be at its peak in Vermont. Join us on Vermont's biggest birding day - the Vermont Backyard Bird Quest 2020. And help us celebrate and document all the spring birds across the Green Mountain State.

Although birding—and life in general—has changed for all of us in recent months, spring’s arrival and the return of migrant birds continue on pace. With recent passage of most waterfowl through Vermont, we birders now eagerly await the flood of songbirds that is just beginning to gather momentum. Spring migration is an exhilarating phenomenon, which now brings welcome comfort and rejuvenation to us all during these disconcerting times.

The Vermont Backyard Bird Quest is modeling this one-day effort at recording all of Vermont's birds after traditional "Big Sits" (24 hours of birding within a 17-foot diameter circle) and “patch birding.” We are asking people to bird individually (or with their families) on May 23, either from a single spot or by thoroughly exploring a defined “patch” around or near their home.

Participating is easy. Wherever you are in Vermont, you can be a part of the Vermont eBird community on May 23rd. Please remember to always put safety first and follow all local safety guidelines and closures. You can even enjoy birds from inside your home and still be part of the Vermont Backyard Bird Quest.

If you can spare at least 5 or 10 minutes, report your observations to Vermont eBird online or with the free eBird Mobile app. If you have more time, submit checklists of birds throughout the day at different times. You never know what you might spot. Your observations help us better understand Vermont bird populations through products like these amazing animated abundance maps brought to you by eBird Science using data collected by bird watchers like you!

How many checklists can we collect as a Vermont eBird team in one day? During the 2016 May big day, Vermont eBirders recorded 480 checklists comprising 181 bird species!  Will you join us on May 23rd and make the Vermont Backyard Bird Quest 2020 the year that we surpass 500 bird checklists, in one day, scattered across Vermont? Maybe we can top 190 species in one day, too? Help us set a new Vermont eBird record and help collect data for science and conservation at the same time!

How to participate


  • If you don't already have one, get a Vermont eBird account: Vermont eBird is part of a worldwide bird checklist program used by thousands of Vermont bird watchers. It’s what allows us to compile everyone’s sightings into a single massive list—while at the same time collecting the data to help scientists better understand birds. Sign up here. It’s 100% free from start to finish.


  • Watch birds on May 23: It’s that simple. You don’t need to be a bird expert or go out all day long, even 10 minutes in your backyard counts. The Vermont Backyard Bird Quest runs from midnight to midnight. You can report what you find from anywhere in Vermont (or beyond, really).


  • Enter what you see and hear in Vermont eBird: You can enter your sightings via our website or download the free eBird Mobile appwhich makes adding what you see even easier. You can enter and submit lists while out birding, and the app tracks how far you’ve walked so you can focus on enjoying the birds. While you’re downloading free apps, try out the Cornell Lab’s Merlin Bird ID app for help with identification. 


  • Watch the sightings roll in: During the day, follow along with sightings from all over the state in real-time on our live updates page.
  • Vermont Backyard Bird Quest Pro Tips

    During the Vermont Backyard Bird Quest, we have a unique opportunity to celebrate and help protect the things we hold dear. That’s why this year, VCE’s birding team, the Green Mountain Goatsuckers, will include all members of our staff for a special 24-hour marathon of socially-distanced birding. We need your help. Each of us will be scouring our backyards and favorite local patches to find over 150 bird species and raise funds for VCE's conservation and science projects.

    Your pledge to our team gives birds another chance to return to our feeders, our skies, and our lives. Please make your mission-critical gift now to help our wildlife projects today! And no matter what you do, have fun, enjoy the birds you find, stay safe, and share your sightings on Vermont eBird. Because in our world, every bird counts.

    Publicado el mayo 19, 2020 07:42 TARDE por kpmcfarland kpmcfarland | 0 comentarios | Deja un comentario

    26 de mayo de 2020

    Tech Tip Tuesday: All About Accuracy Circles

    Believe it or not, this week marks the 30th edition of Tech Tip Tuesday. To all those who have read along and commented, or taken pieces from it to apply to your own iNaturalist experience, thank you. Our goal in creating this series was to highlight different tricks that we have found helpful in our own iNaturalist adventures. As the weather warms and we all feel the urge to spend as much time outside as possible, I encourage you all to continue reflecting on the topics we have covered thus far. If you have questions or suggestions that you feel would make a good TTT topic, please don’t hesitate to reach out!

    This Week on Tech Tip Tuesday

    iNaturalist is undoubtedly a great way to keep track of your exciting nature discoveries while contributing to biodiversity monitoring. One feature that is key to both creating good data and keeping accurate records for your own reflection is mapping locations. If you have played around with your observation’s location at all, you may have noticed that it has two components: the location designated by coordinates and the accuracy circle around those coordinates given in meters. Today, I’m going to explain the importance of that accuracy circle and how you can change it.

    The accuracy circle shows your location’s accuracy. Essentially, it draws a circle of a certain diameter around the area in which you most likely made your observation. It does this to account for any errors that might have occurred when assigning your coordinate location. The larger the circle, the larger the area you could have made your observation.

    In general, you want the smallest accuracy circle possible while still encompassing your true location. If your location gets automatically added to your observation (often from your smartphone), then chances are the accuracy circle is optimally sized. It’s more likely to end up too large when you manually add the location. The optimal accuracy circle size varies depending on the area you made your observation in. For example, when I make an observation from a town, park, or other feature that is easy to recognize on the map, my accuracy circle can be fairly small (10-15m). However, when I make an observation in the middle of a forest that has relatively few identifiable features on the map, I create a larger accuracy circle (upwards of 200m). Ultimately, my goal is to have the smallest area while still keeping my exact location somewhere inside.

    Besides improving a location’s accuracy, it’s also important to have your accuracy circle optimally sized because it can affect whether your observation gets added to places or projects. If you have ever wondered why an observation hasn’t shown up in a place even though the location qualifies, it’s likely because your accuracy circle exceeds the place’s boundaries. By making your accuracy circle smaller, you will likely find that your observation now qualifies for that place.

    If you can, the easiest way to check an observation’s accuracy circle size is when you are uploading the observation. You can check this by clicking in the box that says “Location” and looking at the circle on the map. The center of the circle is the location that will get marked by coordinates and the size of the circle indicates the range of other possible locations for your observation. You can drag the sides of the circle to resize it so that it provides better accuracy. For example, if you know you made your observation in a park, don’t size your accuracy circle to include the parking lot nearby. Just keep it to the area in which you could have made your observation. You can then either click the back arrow in the top left corner of your screen (mobile phone) or click “Update observation” at the bottom of the page (computer) to save your observation and continue filling out other information.

    If you want to check an observation that you have already uploaded, go to the observation’s page and click “Details” under the right corner of the map. You will see it as “Accuracy”. It’s difficult to say an exact distance at which your accuracy circle should be edited, however you will likely be able to gauge whether or not it’s the appropriate size based on the location. For example, if the observation was made in your backyard or town and the accuracy circle is over 300m, you may want to make it smaller. Just remember, the more certain you are about your exact location, the smaller the accuracy circle can be.

    If you do notice an observation whose accuracy circle seems inaccurate, you can change it by clicking “Edit” in the top right corner of your observation’s page. On the editing page, you will notice three columns of information. The middle one says “Where were you?” across the top. The top box says the location name and below it there is a grey box with “Lat”, “Lon”, and “Acc(m)”. The Acc (accuracy circle) is what you need to change. In the top right corner of that box, there is an “Edit” link--click on it. You will now be able to edit the contents of the boxes.

    Once again, the new buffer size depends on where you are and how certain you are of your location. In general, the only times my accuracy circle is 1km or above is if my observation is from a large, densely wooded area like a national forest that lacks features that may clue me in to my exact location. Usually, my accuracy circle ranges from 6-50m depending on the location. Once you edit your accuracy circle, you can scroll to the bottom of the page and click “save observation”. If you were trying to get the observation to qualify for a place, check if the observation is there. If not, you may be able to resize your accuracy circle a little more to get it to qualify while maintaining accuracy.

    I realize that there was a lot of information here, so to summarize:

    Your observation’s accuracy circle indicates the area where you could have made your observation (i.e. the location’s accuracy).
    You want your accuracy circle to be as small as possible while still including the true location in it. This may look different depending on where you are (town or yard versus a national forest).
    The size of your accuracy circle can affect whether your observation gets added to a place.
    You can change your accuracy circle size either when uploading or by visiting the observation’s page.

    TTT Task of the Week

    This week, I want you to check out your accuracy circle sizes when uploading. I also recommend picking three observations from different locations and checking their accuracy circle size. If they seem too large, try decreasing the size, even just by 50-100m. Finally, if you have observations that should have automatically shown up in a place or project but didn’t, try resizing the accuracy circle and see if that helps.

    That’s all for this week! Thank you for helping us monitor Vermont’ biodiversity, stay safe, and happy observing!

    Publicado el mayo 26, 2020 06:51 TARDE por emilyanderson2 emilyanderson2 | 0 comentarios | Deja un comentario

    Archivos